Home
Menu
Base Unit
Lift
duct Thrust
Duct Motor
Mounts Front
Cabin
Centre Cabin Air Duct Cover Skirt R/C Installation
The Skirt
The Patterns
The skirt patterns were downloaded from Mark's site but they need expanding
before they can be used.
I used Corel Draw's real world dimensions to expand the patterns to the correct
size for the model.
Please note the following update on the patterns- Jan 2004)
Users have reported problems with the dimensions
when printed out from the PDF file. I have found that the PDF file has lost
the overlap I had originally set up to enable the printouts to be made into
the correct patterns. I cannot cure this problem so have recreated the patterns
in a different format before passing to the PDF creator.
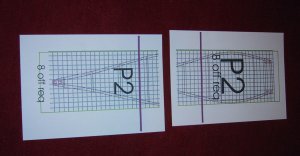
The following photos show the sequence to joining
the patterns. P1 is the same except there are four pieces instead of two.
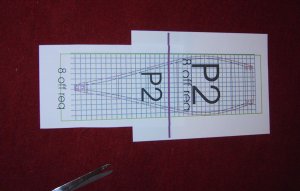
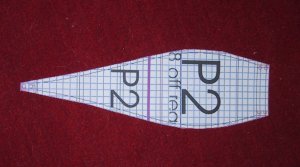
Printout
of pattern P2 |
Trim some material off
the sides and top of the lower part |
|

|
|
|
Lay
the lower part over the top part and align the thick colour bars
and the border edging. Glue the parts once aligned, I used sellotape. |
Trim off the excess material to give the pattern |
|
|
Please also note that as the patterns are blown
up from Marks originals on his site the grid of 10mm is not consistent across
the pattern. I have maintained the aspect ratio of the originals. This means
that the patterns are slightly undersize giving a length of 380mm instead of
387mm. I assume this is due to the graphic compression used on the originals.
This does not prevent the skirt from working but the centre section which Mark
sizes as 600 x 387m should be checked by measurement on your machine after
temporary fitting of the front and rear skirt sections. If you want to make
the patterns as close to Marks as possible then add 3mm to each side and 7mm
to the top and bottom of each pattern when cutting. These additions should be
corrected for your own patterns by measurement before trimming. The following
sizes should help.
P1= 312mm wide x 387mm long P2=
113mm wide x 387mm long
P3a= 136mm wide x 387mm long P3b=
136mm wide x 387m long
The Full size patterns can be printed from the following PDf file.
Full size skirt patterns(download PDF file) (310Kb)
(The
text and above photos are included in the PDF file for reference)
When the file is displayed, you will
need Acrobat reader, print out the pages. You will get 10x A4 pages which need
trimming and pasting together to give the patterns. Take care in matching up
the pages, the coloured borders and green cross enable this. Use the coloured
borders to identify the correct matches.
I copied enough patterns so that I could lay out all the patterns required
before cutting any skirt material. This way I could make the best use of
the material.
Skirt Material
The material I used is a rubberised nylon material used for tent making.
It is light and very strong, the skirt is still going without holes after 12
months use on land and water. No water has ever entered the interior of the
skirt chamber during this time.
Gluing the skirt sections
Construction of the skirt is achieved by gluing the edge of each pattern
together using approx 5mm of material at the edges. I cut a Fablon template
to match the curved edge of the templates and use this as a guide to prevent
the glue from spreading out across the material when the two edges are pressed
together. The skirt was assembled as four separate corner sections. The seams
were then machine stitched through the glued area. If this is done while the
glue is still tacky then a water proof stitch will be made. The front and rear
centres were then added and stitched followed by the long side sections. Take
care with these to prevent a twist in the skirt, it is easily done. Use a strong
thread and fine stitch on the machine when sewing.
Skirt mounting

Original baton mounted skirt with baton removed |
Front end of skirt with baton removed |
Baton and clips that hold top edge of skirt |

Sealed front flap valve can be seen |

Corner mounting |
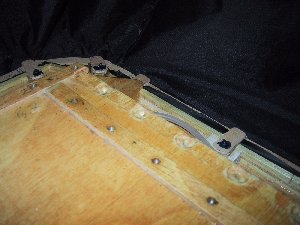
Front-- adjusted position of skirt mount can be seen
|
The skirt was originally mounted using a bolted wood clamp method, this was
later changed to self adhesive tape without any problems. The skirt can be removed
and replaced after inspection without changing the tape.
To fit the skirt place the double sided tape all round the outer edge of
the model then start attaching the skirt by fixing the front straight edge first,
then the first corner on one side and then the other corner. Do not attach any
of the side material yet. Attach the rear straight edge and corners just as
the front. Lastly attach the side edges before attaching the lower skirt edge
using waterproof tape. Again attach the front and back sections first followed
by the sides. Any excess, there should be very little, should be gathered in
at the corners. I then fitted a door stop rubber foot to each corner to prevent
damage to the model when settling on hard ground but also to add strength to
the skirt attachment at the corners as this is where it all comes undone first.
I found a problem when blowing up the skirt for the first time in that the
skirt at the front and back of the model did not correctly match the floor contact
of the sides. Mark's dimensions for the outer deck edge at the sides do not
match the dimensions for the front and rear equivalent deck edges. The skirt
lower fitting at the front and back needs to be moved in towards the center
of the model by 30mm to correct this problem. This gives an even skirt shape
around the model and prevents the air loss I had when first running up the model.

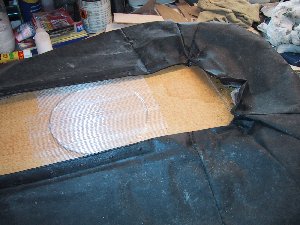
Air filled skirt viewed via glass panel -rear end |

Air filled skirt viewed via glass panel -front end |